Today I'm excited to be a part of a blog hop all about the design process. Eight designers have come together to talk about how we turn new ideas into new things. Designing is a highly personal process, and it's somewhat mysterious, too. It's really special to have this chance to show you how it works for me and I'm looking forward to hopping along with everyone's posts today.

Recently, I've been working on making plush toys that illustrate popular nursery rhymes and this week I've been focusing on Mary, Mary, Quite Contrary. The most common version of this rhyme goes like this:
Mary, Mary, quite contrary,
How does your garden grow?
With silver bells, and cockle shells,
And pretty maids all in a row
I remember seeing illustrations of this nursery rhyme in which the "pretty maids" were flowers with faces in the center. That made me think about my Flower Power Rattle. When I designed that toy I considered putting a face in the flower's center, but decided in favor of keeping it very simple. Now I wanted to explore what more could be done with this idea.
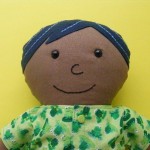
When I begin a new design I almost always start with something I've already created. It might just be an old sketch in my sketchbook or it might be a fully-developed pattern that has some of the features or shapes I'd like to reuse. I'd much rather start with something I've already begun than face a blank page!
This was my starting point:

My first thought was to try sewing it in quilting cotton. Lots of people like to sew toys with quilting cottons because quilting cotton come in so many pretty prints. I actually really don't like quilting cottons for toys. You can see every lump of stuffing because they have no give and they aren't soft. What fun is that? But from time to time I give in to what I think customers might want and I try sewing with cotton.
Having too much faith in myself, I spent time embroidering the face and sewed a sample in nice fabrics.

Oh my goodness, no. She looks like she has jaundice and the measles at the same time. And she's bald.
From this first try I learned:
- No more dots.
- The center needs to be flesh-colored.
- The face needs to be rounded, more like a doll's face.
- If the petals were all one piece the toy would be easier to assemble.
I tried again.

I didnt' waste time adding features or sewing on hair this time. I just drew them on in marker.
From this try I learned:
- A rounded face is great, but it needs to be proportionally smaller.
- I don't love the seams that run down a face made with three pattern pieces. One piece with darts will make a smoother face.
- Petals that are all
one piece are certainly easier, but they need to be proportionally
larger. - Topstitching the petals is important to keep them flat.
I tried again.

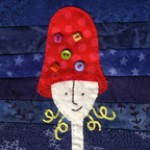
I gave up on the quilting cottons because I knew this toy would be so much better in fleece. Whew. That cotton was bringing me down! I'm pretty pleased with this flower lady. She's simple to sew and she's like a doll inside a flower. That's what I was going for.
Looking at her closely I thought it might be neat to see if I could imitate a specific flower. What if her hair was black and her petals were yellow so that she looked like a sunflower?
I tried again.

I find this color combination to be really pleasing. It's bright and attractive and a baby can focus their eyes on the black and white of the face. I also think it was interesting to change the petal shape so that now I have two petal options: roudned and pointed. I ran out of yellow fleece so the back of the flower is a bright green, but I actually love that. It looks freshly picked.
I'd like to make another with pink or red petals and blonde hair. The three together with be the "pretty maids all in a row" that initially inspired this design.
+++++
I have to say that it felt pretty uncomfortable to show you the sorta terrible looking creatures that preceeded my Pretty Maids Rattle. It's much nicer to just say, "ta da!" with a finished project in hand that I'm proud of. The truth, of course, is that all kinds of awkward failures come first.
My best design advice? Persist. The hours spent drawing and cutting and sewing those failures are never a waste of time. They are the process of taking a thought and making it into something that you can hold in your hands. It's a wonderful way to spend your day.
If you like seeing the design process unfold I invite you to hop around to all of the bloggers who are giving a behind the scenes look at their design work today. Here they are and thank you!

Thanks for showing the “duds”! It’s so helpful to see how things evolve and to see how much thought is invovled. I love your new flower faces, very cute idea.
I love seeing all the failures! It lets us share in the a-ha moment when you finally get it right. And this rattle is super-cute!
I love seeing the failures too! But what I thought was most interesting about your post was a single line. “I ran out of yellow fleece so the back of the flower is a bright green, but I actually love that. It looks freshly picked.” As soon as I saw the image that showed the rattle from the back I thought to myself that I LOVED how you made the back of the flower in green. It was so simple but such a nice detail! And then it turns out it was all because you ran out of yellow fleece. 🙂 I often find that the best design details come from an unexpected limitation – like running low on a certain fabric. Brilliant!
It’s so cool to see all the iterations leading up to your finished design! I loved getting a glimpse of how you evaluated each prototype and decided what changes to make. I think this is the skill that sets a designer apart from a maker. A maker is happy that the thing got made; the designer is always seeing how it could be made better next time. Thanks so much for sharing your process!
Love this! Funny, yesterday I posted about my experiments as well. They’re not failures, you’re just testing out your hypothesis. Wow, I finally put those science fair skills to work in my adult life. 😉
Thanks, I really enjoyed the blog hop idea.
It’s great to see the design process. I actaully like your cotton one too but I quite see that it becomes a different softy more suited to its purpse when done in fleece. When I have an idea I jot it down in the form of a really hideous drawing from which I can see potential and I get quite excited. When I go to make it, it ends up often very different but sometimes very similar to the original idea.
Making softees is not something I do often because I have no one to make them for, and selling them is ridlled with beauocracy but from time to time I have a bash for my own amusement. It is the hardest and at the same time most fulfilling thing I have done. My eureeka moments have been very proud if only a few.
Thanks for walking us through your design process . I found it really helpful and interesting. I liked that you start with something you’ve created before to work on rather than a blank piece of paper. The blank sheet can be intimidating, hehe. It really does make a difference in the fabric used, your Pretty Maid’s Rattle is darling! Thanks for sharing.
usairdoll(at)gmail(dot)com
I love this post! What great ideas.
I always design with the fiber too, whether it’s knitting or sewing. I find that I can get a better idea of how it’ll work when I can see the progress in 3D.
Right! I think in three-dimensions. It’s almost like sketching with fabric.
I’m not a fan of the blank sheet of paper. Even if I end up changing everything, I’d rather start with something I’ve already begun.
Making softies is a most challenging three-dimensional puzzle, but I totally love it.
That’s an interesting differentiation, Diane. I’ve certainly been in both roles, and found them both to be satisfying.
It’s the happy accidents that are sometimes the best features of a new design.
Thanks, Laura!
Thanks, Betz. Generally I cut up the duds and harvest the stuffing. Having to wait this time and take pictures of them was painful! But now that this post is up I can shred them. Ahhh.
It’s nice if the first design is the ta-daaa, but if it’s not I think it’s very cool that you can share the process and all the hard work that you put into one such small item as this!
I love the last sun flower, and I’m sorry to say because you don’t want to hear this, but my favorite is the polka dot one! I think it looks so happy, maybe because I love patterned cotton and polka dots in particular, but also because the face looks like a freckled sun which I love. 🙂
On second thought, I don’t have children and I’m sure a toddler would like the soft ones better as you say… Maybe the polka dot one (just the flower) could be a pattern for a pin/brooch for grown ups like me? I’d bye the pattern and make one.
Fascinating! Thank you.
Abby, thanks for sharing your process!
I love all of these dolls and I don’t think any of them are a “failure” but a really important process… I wouldn’t shred anything of it!
The first flower is so cute and the polka dot too!
Great work!
Hey Diane, your comment about makers vs designers really got me thinking. I posted my thoughts on my blog here if you want to see what I concluded:
http://creativeupcycling.blogspot.com/2013/08/what-makes-maker.html
Thanks again for another amazing blog post! I have been reading your blog for 5 years and I always look forward to your new posts. 3 of those years I have been studying model making and 3D design, and the last year and a half I have been trying to find my way. After spending far too long trying to find a job that allows me to use my creative talent I’ve decided to try and take the plunge and become self-employed.
You are one of my inspirations that have helped me find the courage to give it a go. I am currently working on my own designs (not softies but I would love to try these) and fingers crossed I will be ready to ‘test the waters’ at a local craft fair in October.
I am commenting now as I might have something useful to give back. I have just been catching up on my reading and in reference to your earlier post on drawing a little tip if you want to improve. If you do these two things in one year you will see amazing progress.
1.Read Drawing on the right side of the brain by Betty Edwards and 2.Draw every day something from life – even if it is only for 5mins if you draw every day you will only get better.
The Creative Licence by Danny Gregory is also a great book and he is very inspirational.
That’s terrific to hear, Michelle! Best of luck in your new adventure. I’d love to hear more about it and thank you for these book and drawing practice recommendations. I’m working on it!
This was a treat. I just read your newest book “Stuffed Animals from Concept to Construction”. I was up in the mountains and did not have a chance to try out the ideas. I did make a few birds from your “Artful Birds” book. As so many have shared, we are not always so keen about showing our attempts. It is a part of the growing and laughing process. Thanks for sharing on this Blog Hop
Reading a craft book while up in the mountains sounds like heaven to me, Michelle! Thank you so much! I’m really glad you’ve enjoyed both of my books.
Love this Abby, she is so cute. I think the green on the underside of the petals works really well, adds colour & many flowers have those little green leafy petals on the underside. It was interesting to see the process, & for those of us still learning, it’s a reminder that the dodgy prototypes are just part of the process & not the result of a lack of talent or skill. 🙂 Looking forward to reading the other posts. Thanks 😀 Ps. I think she looks better in fleece 😉
So cute!