I love pins. Pins are like tiny fingers that never get tired. If you pin properly you can seam together any two pieces of fabric easily and neatly and create almost any kind of three-dimensional softie shape. Yes, pinning is tedious at times, but it’s this sort of preparatory work that makes sewing projects succeed.
Softies are made from all sorts of fabrics, including thick fleece, long-piled faux fur, and slippery minky. I always use a lot of pins when I sew softies and it’s especially important to pin well if you choose these more challenging fabrics.
Okay, let’s pin!
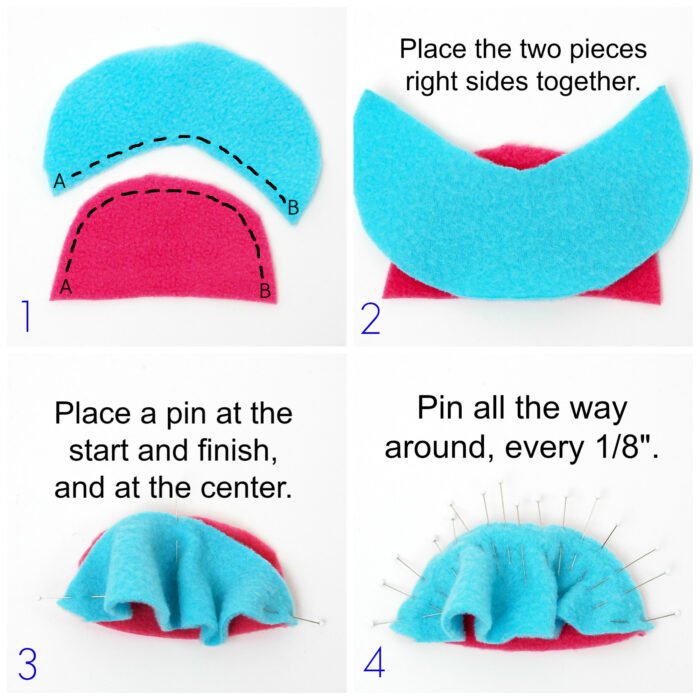
1. Let’s say the pattern instructions tell you to sew the pink piece to the blue piece from point A to point B.
2. Place the two pieces right sides together. (Not sure how to tell which side of fleece is the “right” side? Here’s my post about that.)
3. Now put a pin at point A and at point B, and at the center top. These are your guide points. If you need to do any easing, you can do that between the points and know that everything will line up at the end. Notice that I’m placing the pins perpendicular with the edge of the fabric. This makes it easy to pull them out one by one as I sew (pins placed parallel with the edge of the fabric tend to end up under the presser foot).
4. Look how many pins! I place a pin every 1/8 inch or so. Why? Because softies generally have a narrow seam allowance and there isn’t a lot of room for error, plus that thick fleece tends to shift around a lot under the presser foot. Better safe than sorry!
After a few months some of my pins end up totally bent. I sew softies from thick fabrics every single day. All that pulling and gripping tends to bend my pins out of shape. I’ve experimented with the sturdier, thicker pins, but I still prefer these sharp, glass-headed pins (and the thicker ones end up bent, too!). Once they look like this, though, they’ll no longer hold your fabric accurately. Time to toss ’em.5. Now you can stitch from point A to point B, pulling out each pin just before it goes under the presser foot. Clip the curves so they’ll open up when you turn the piece right side out.
6. Admire your lovely curved softie part!
I’m in the midst of designing a fleece doll right now, and this is the technique I’m using to create Mary Jane shoes for her! The secret to making it easy to sew these shoes? Lots of careful pinning, of course!
thanks for the tip. I’m thinking this is good for the fish head in your book? I was too lazy to use all those pins. I sure will next time. :}
Yes! Exactly.
I was a little confused about the first few diagrams, since you could be sewing from A to B along the top or the bottom of the piece. Then in #2 it looks like they are going to be lined up at the bottom, but are pinned along the top in #3. Perhaps you could add in some dotted lines, arrows, or add a third letter at the centers to make all that more clear.
i used to think that once you became a pro you could skip all the pinning, but it seems the pinning makes you a pro, eh? 😉 Just got your book yesterday and my little one is struggling with the decision of what momma should make first 🙂
Hi Tiffany,
What a great suggestion! I love finding ways to make things more clear. I’ve updated the graphic to show some dotted lines between points A and B where you will stitch. What do you think?
-Abby
That’s so funny, Caroline, because I thought the very same thing! It turns out that expert sewists spend even more time pinning and marking and basting and generally preparing fabric before stitching, not less!
The dotted lines look great!! I think #2 threw me off because they were aligned along the bottom, but I don’t think it was done on purpose (just laid on top of one another).
Are all pins created equal or do I need a specific kind of pin?
Hi Robbin,
I like pins with glass heads so that there is no danger of melting under the iron. I also find them to be thinner and sharper than the standard plastic-headed pins. But you really don’t need anything special to pin softie parts together.
I hope that helps!
Hi,
I tend to baste/tack on fiddly parts before machining. Could this be done here or would the fabric still move?
You’re tips are always so helpful.
Tricia
Hi Abby,
I am also struggling with the connection of convex to concave on this fish pattern. I looked at this tutorial, but I still find myself baffled at how these pieces are supposed to come together. How is the concave part supposed to bunch up while the convex bit gets all folded up? My cotton pieces seem to want to do it the other way ’round. Would it be possible to make a video of the pinning process? Thanks for your help…