
Summer is here and so is strawberry season in New England. We will be picking strawberries this afternoon when we visit Land’s Sake Farm in Weston to pick up our weekly CSA share.

I’m looking forward to strawberry shortcake, strawberries with whipped cream and a bowl of juicy, tart strawberries at breakfast.

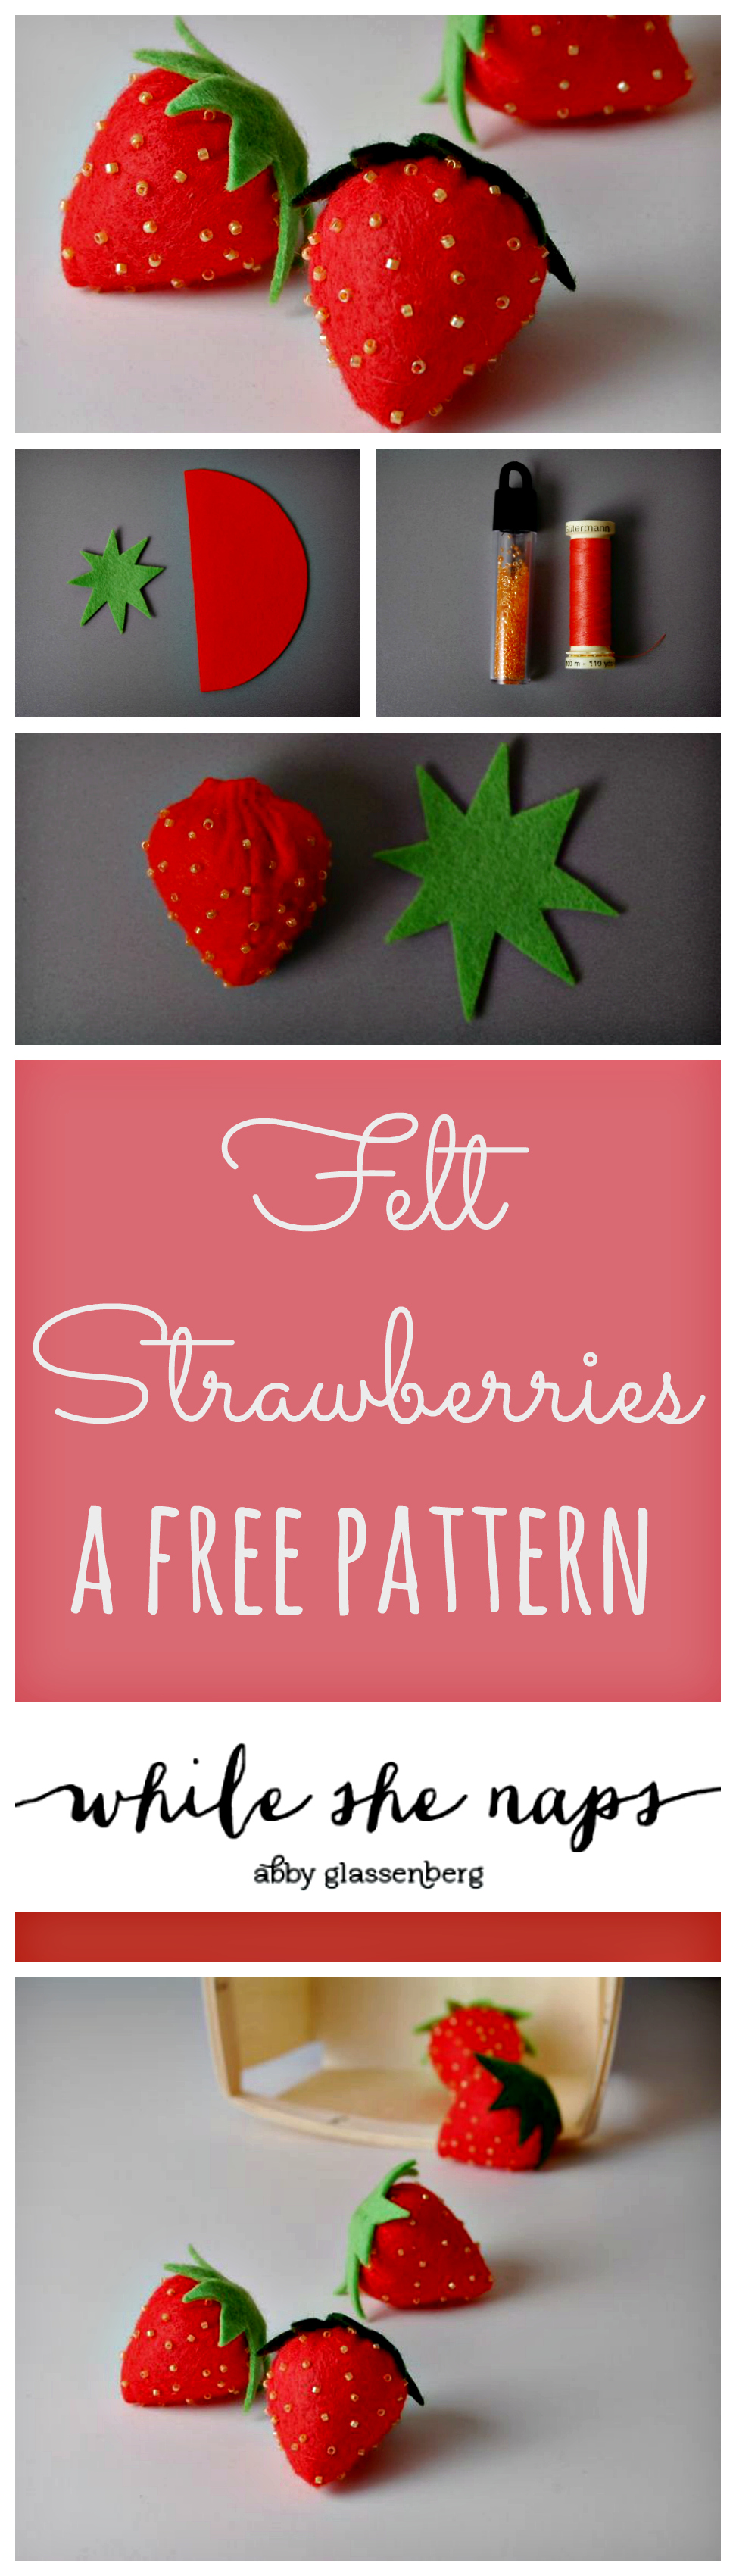
I made some felt strawberries this morning, embellished with some sparkly seed beads, and I thought you might like to make them, too!

You’ll need:
-paper and pencil (I like to use freezer paper for patterns)
-scraps of felt in red and green
-about two dozen seed beads
-craft glue
-extra-strong thread and regular sewing thread
-small wad of stuffing
Instructions:
To make a pattern for the strawberry, draw a half circle with a 4″ diameter on a piece of paper and cut it out. Draw a free-form strawberry leaf on paper and cut that out too.

Pin the half-circle to a scrap of red felt and the leaf to a scrap of green felt (or iron if you are using freezer paper). Cut out the felt.

Fold the half-circle in half and stitch along the straight side.

Turn right side out and stuff.

Using the extra-strong thread, make a running stitch along the top edge and pull the stitches to gather. Push a bit more stuffing inside, then tie off the thread to hold the gathers in place.

Now it is time to attach the beads.

Thread a needle with a small eye with regular sewing thread. Insert it through the top of the strawberry, coming out on the side. Thread a seed bead onto the needle, then insert it back down into the strawberry right next to where it came out.

Continue adding seed beads, one at a time, coming out about an 1/8″ away from the last bead, until the entire strawberry is covered. Tie off the thread hiding the knot near the top of the strawberry.

Squeeze a ring of craft glue along the top of the strawberry.

Place the leaf on top of the glue. Use pins to hold the leaf in place until the glue dries.

Admire your strawberry!

Like this post? Sign up for my newsletter for more fun projects!

And check out my Etsy shop for lots of easy-to-sew softie patterns!
Those are so cute! Thanks for the clear and easy tutorial!
Your strawberries are so sweet! Thanks for the nice tutorial. I’ve been enjoying local, ripe strawberries the last few days myself–yummy!
Jennifer
Ooh really lovely tutorial, thank you!
Wonderful tutorial! These would be perfect for the nature table. I could also see them being fed to the baby dolls as snacks.
These are adorable – strawberries just sum up a feeling of happiness!
Loved seeing that. I wish you would tell me where to find emory or is it emerie…to fill the strawberries to sharpen my needles. I got a little “kit” at the City Quilter for one, but I want to make a lot. Sand might do it, but I am not sure.
Steel wool works! I found some fine gauge steel wool at the hardware store that works great for pincushions!
Thanks for sharing such a sweet, clever idea! I can’t wait to make some of my own.
I love your strawberries. I’m going to weave a little basket & make some for a topping of a bridal shower gift, it would be so cute. I also like the idea of putting steel wool in a strawberry to add to a handmade pinkeep.
When my 3 sons were little they made strawberry ornaments out of walnuts, painted them red and glued on white seed beads,the leaf and ribbon hanger.(for all of the grandparents etc.)
We had our first strawberry today from the tiny patch in our front yard. I love your felt strawberry, what a perfect little project to tuck into my purse to work on while waiting to pick up various kids from various camps! Thank you!
love them.
Cuuute! I’ve just made a red and a blue strawberry! My DD’s new book is about blue strawberries!
Cutest strawberry… even more than real… so nice work dear I really love it… I ll go and try to find that true colour felt thanks a lot for the easy and understandable tutorial … going to subscribe you
Visit me whenever you can
http://craftaworld.blogspot.com/
Love
Farah
Gracias por compartir el tutorial. Saludos.
very cute…….lovely
So cute – and nice, easy directions too! Came from “Retired in Alaska” to see this, but I’ll be back.
Jane-Jacksonville
These are adorable! they could become badges perhaps? I’m planning a strawberry party for my daughter, and I think I’ll find a way of making these to add to it! thanks x
Thanks so much Abby! This is so much better than the quickie strawberry I made for my daughter last year.
Your strawberries are so sweet! Thanks for the nice tutorial. I’ve been enjoying local, ripe strawberries the last few days myself–yummy!
I’m the Editorial Assistant for Fun Family Crafts and I wanted to let you know that we have featured your strawberries! You can see them here:
http://funfamilycrafts.com/felt-strawberries/
If you have other kid friendly crafts, we’d love it if you would submit them. If you would like to display a featured button on your site, you can grab one from the right side bar of your post above. Thanks for a wonderful project idea!
We’ve just visited our local pick your own farm here in the UK as today was it’s first day open. Lots of strawberries and even more gooseberries made it home with us – jam making time! Love the felt ones, I think I might have to make some of those too!
Looks great. Love strawberries.
These are beyond adorable.
Perfect Mommy & The Girls project for our next indoor day!
Thanks so much for sharing~