
Today I have a fun, free pattern to share with you: the Josephine Doll. I made 10 of these dolls last week for a members of my local artists group. We do a holiday art exchange each year. Everyone makes a series of tiny originals and we put them all out on a table and then walk around, choosing one from each group. It’s really amazing to walk away with 10 new pieces of art!
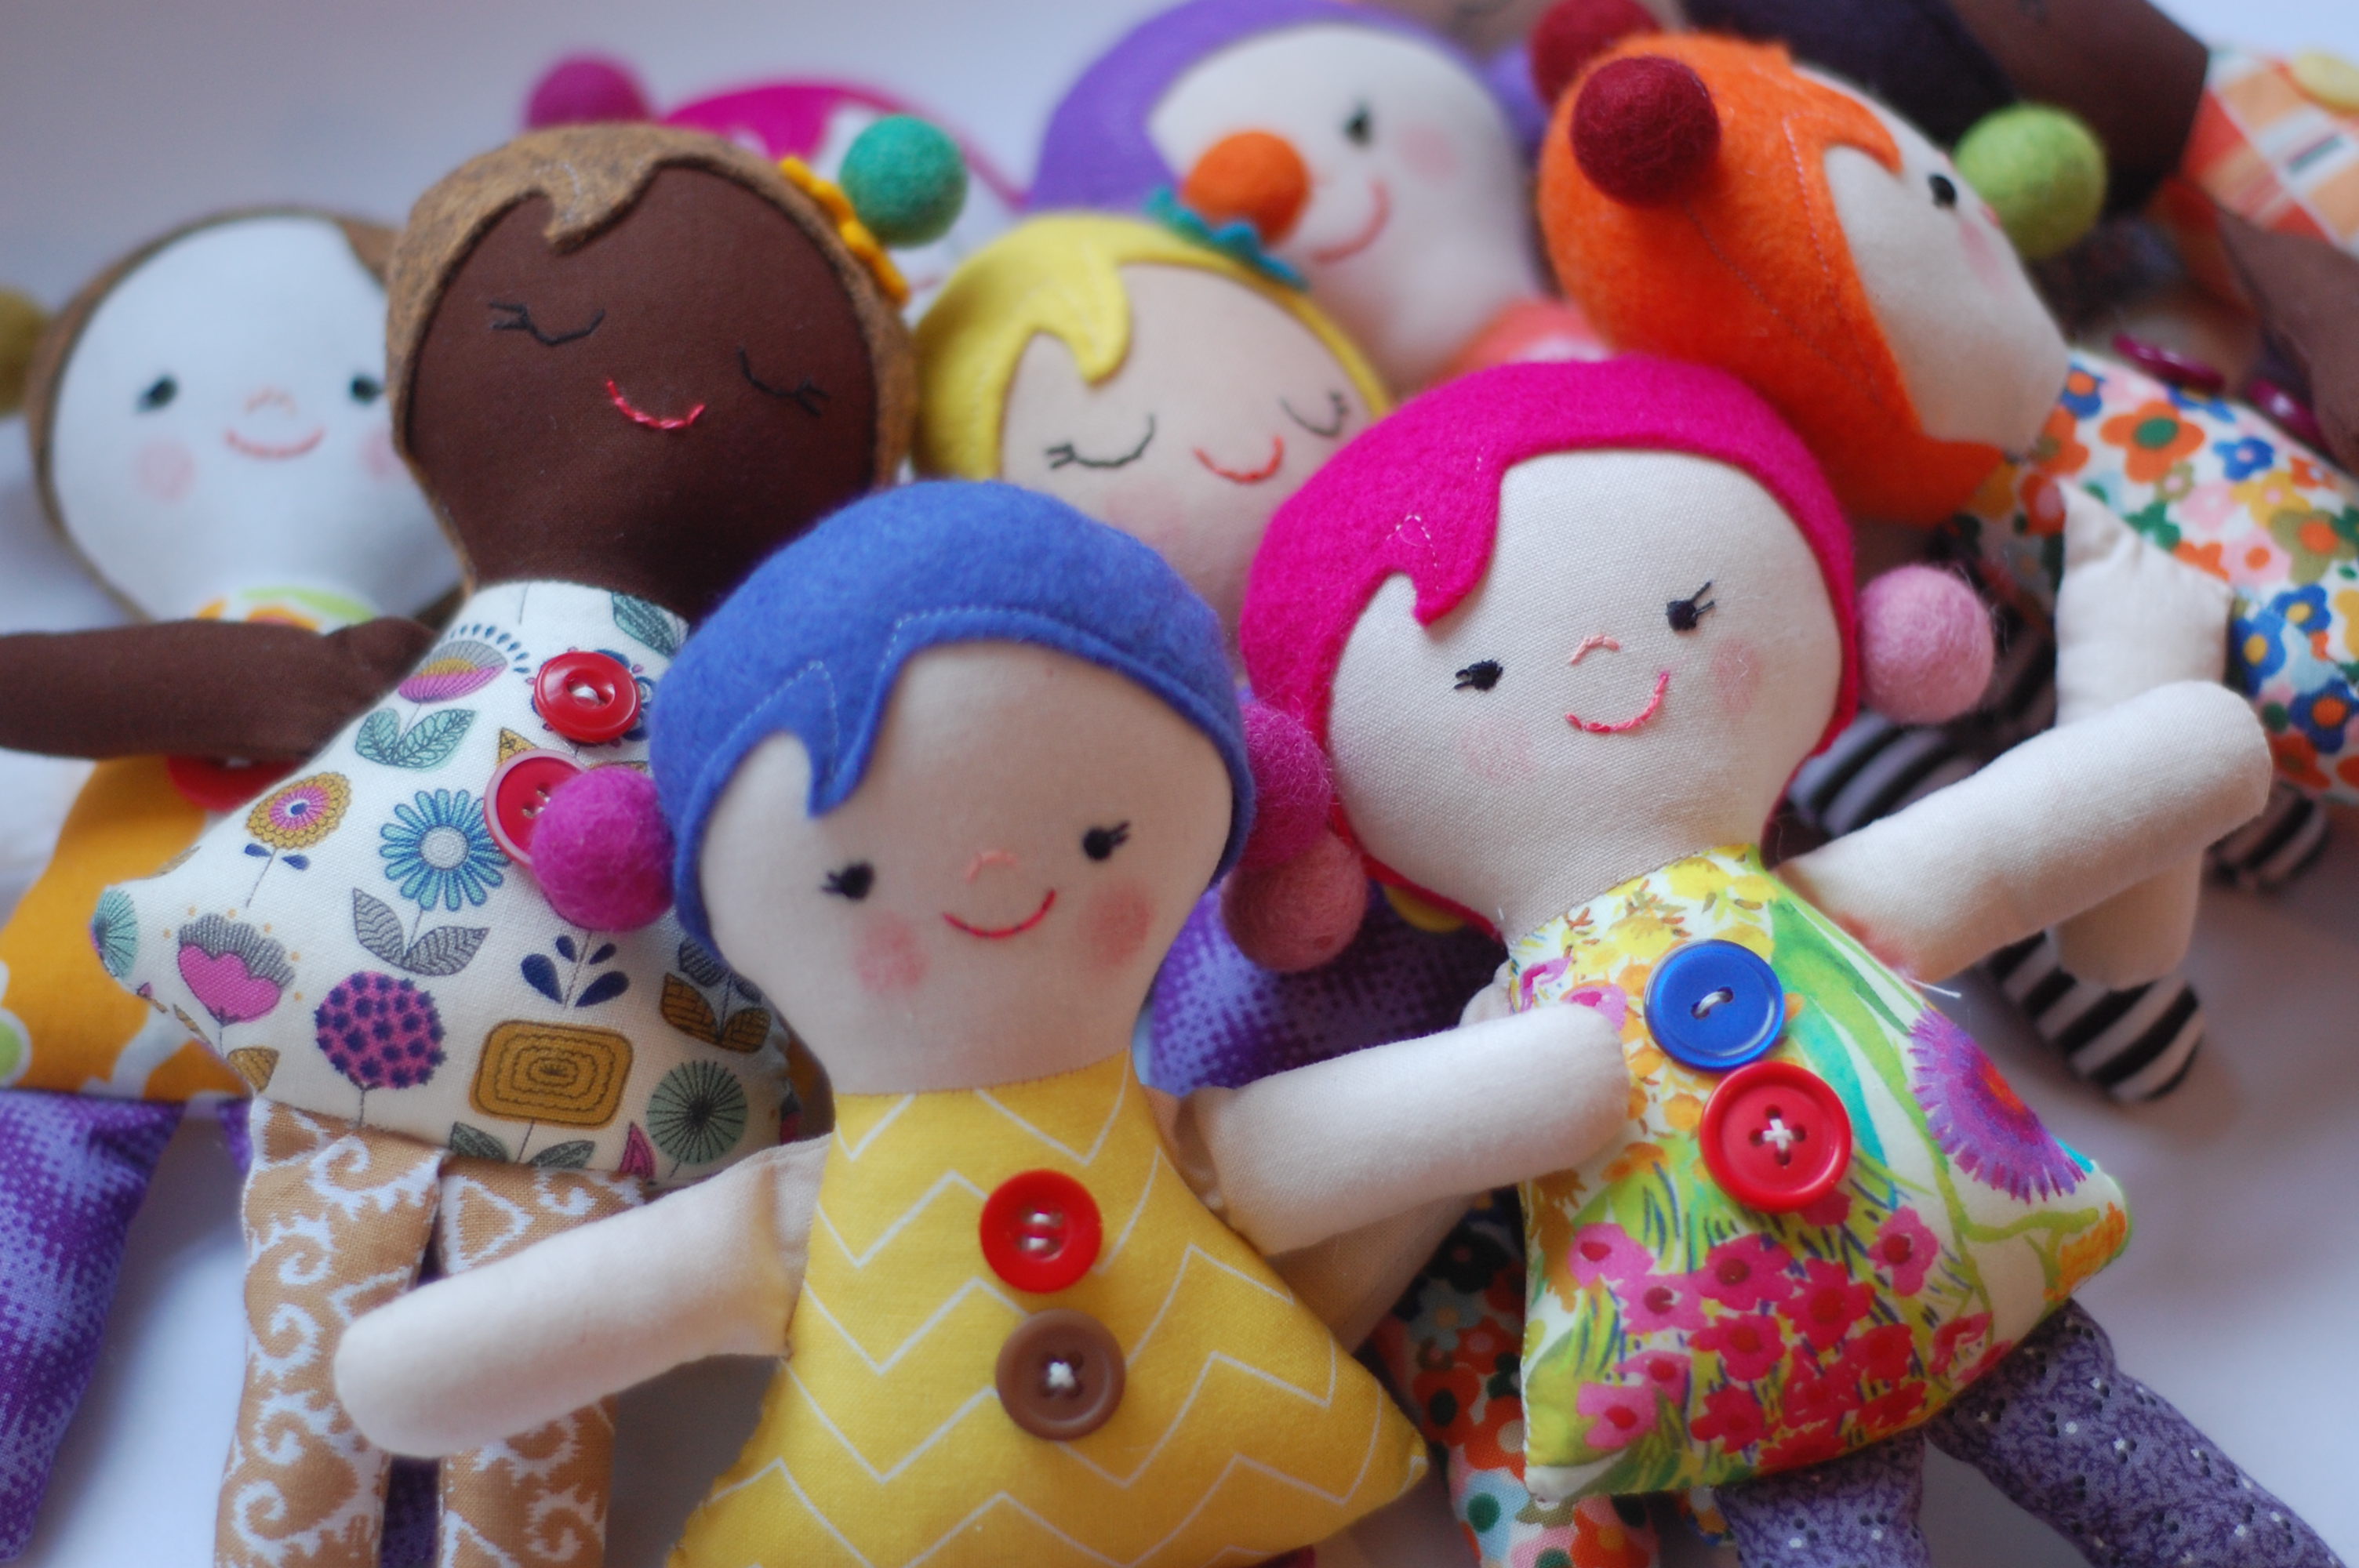
The Josephine Doll was my contribution this year. Last year I made bird ornaments which I also made into a free pattern.
Making these dolls meant pulling out my scrap bin and button box and having a wonderful time pairing up patterns and prints. Each doll has felt hair and some have felt balls as pigtails, too. I love an excuse to use all this fun stuff! I hope you have as much fun with this pattern as I did.
These dolls are pretty small. If you’d like to have an easier time turning them right side out and stuffing them, enlarge the pattern by 50%!
To make a Josephine Doll you’ll need:
- scraps of quilting cotton in flesh tone for the face and arms, in a print from the dress, and in a contrasting print for the tights
- wool-blend felt (I get mine from Wool Felt Central) for the hair
- fiberfill stuffing
- coordinating thread
- embroidery floss (I use black, peach, and pink)
- optional: 1.5 cm wool balls and buttons (find wool balls from various shops on Etsy), lipstick to blush the cheeks
First go ahead and print out the Josephine Doll Templates. Be sure your printer is set to “actual size” (or, like I noted above, enlarge the templates to make a larger doll). You’ll cut along the outer lines and sew along the inner lines.
The first step is to cut everything out.
From felt cut:
- 1 Back of Head
- 1 Hair
From flesh-toned quilting cotton cut:
- 1 Back of Head
- 4 Arms (reversing 2)
From the quilting cotton for the dress cut:
- 2 Dresses
From the quilting cotton for the tights cut:
- 4 Legs
Transfer all of the markings to the fabric with a disappearing fabric marker or chalk (or even a pencil will work).

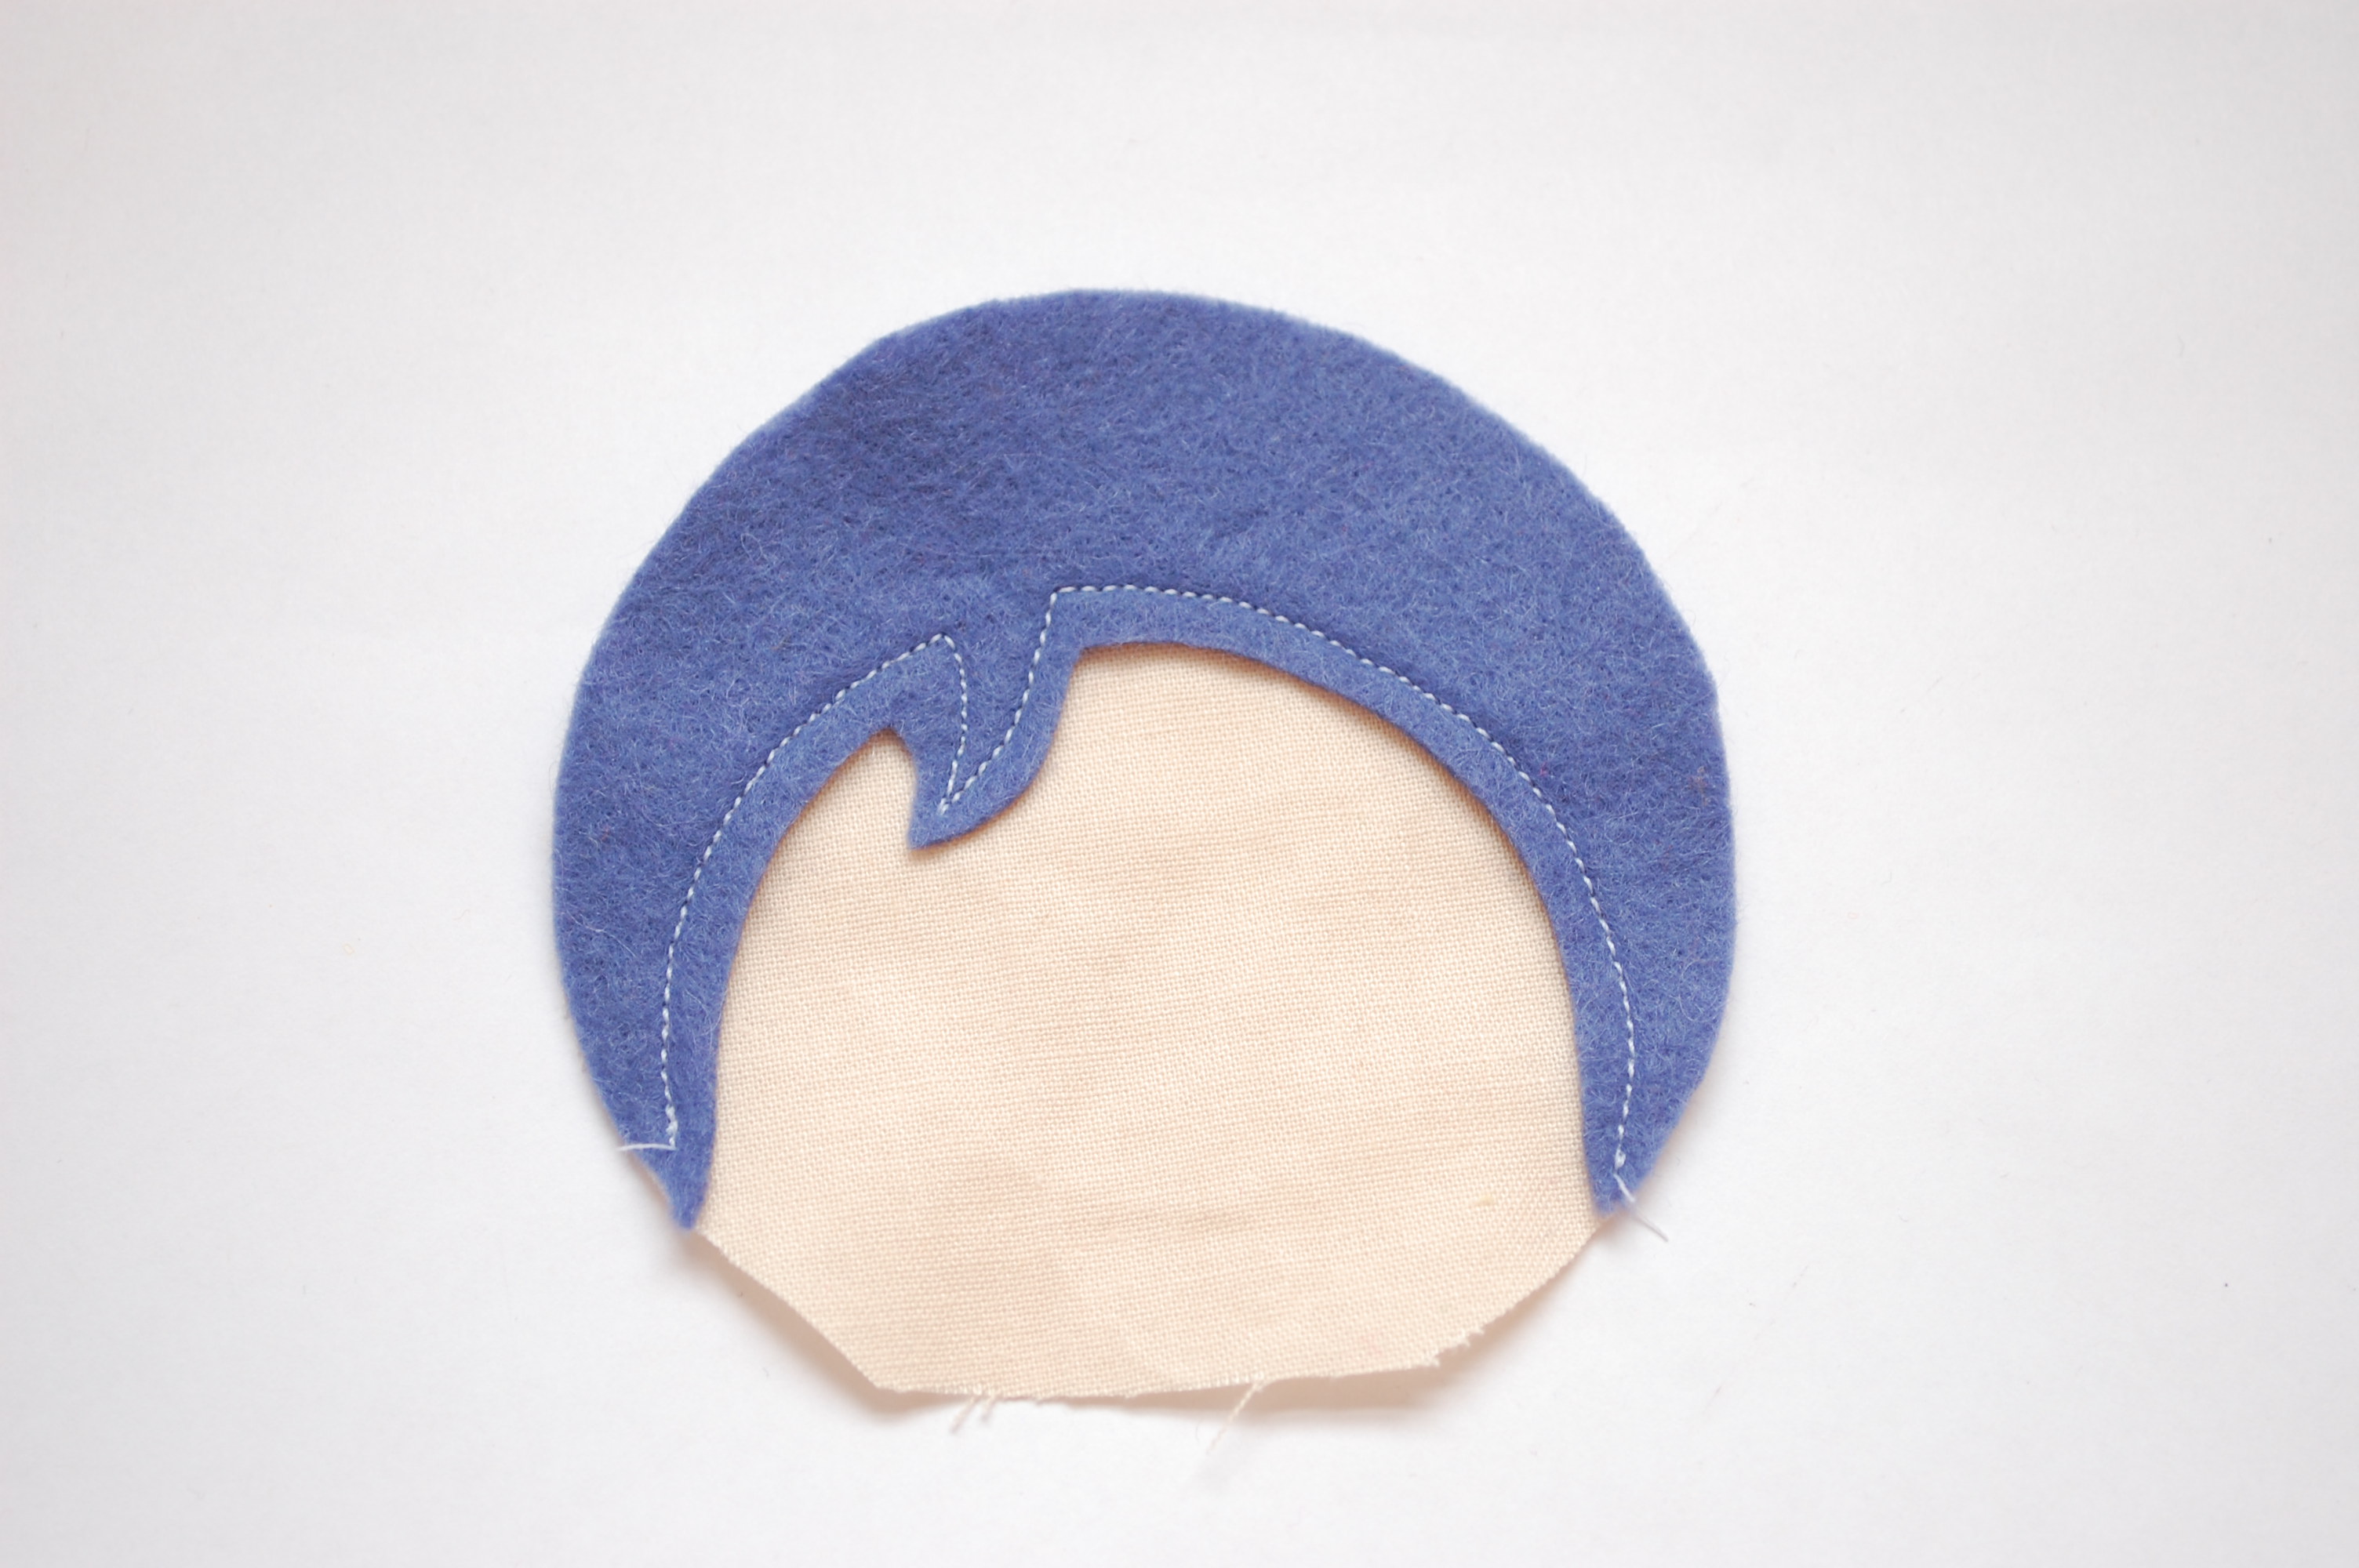 Place the hair on the face. Pin. Sew along hairline. (If you’d like to embroider the face before stuffing, do it now. I prefer to embroider afterward so that I can see the whole doll first.)


Place the face on the dress, right sides together, matching up the markings. Pin. Stitch across, attaching the face to the dress. Place the felt back of the head on the other dress piece, right sides together, and stitch across in the same way. Press the seams open.


Match two leg pieces right sides together and stitch around, leaving the opening as marked. Repeat with the other two leg pieces. Match two arm pieces right sides together and stitch around, leaving the opening as marked. Repeat with the other two arm pieces.
Clip the seam allowances around the curves on the arms and legs and turn the arms and legs right side out. Press. Stuff the limbs, stuffing firmly at the tip and then only very lightly, leaving the last 3/4 inch unstuffed on each.

Place the arms on the front of the doll, as marked. Baste. Place the legs on the front of the doll as marked. (Note that the legs are placed straight up and down which means that a bit of the leg fabric hangs off the edge of the dress.) Baste.

Place the doll front on the doll back and pin around the sides and top. Leaving the legs hanging out for now, stitch around the sides and top of the doll, beginning at one bottom corner of the dress, going up around the head, and coming back down at the other corner of the dress, leaving the opening as marked. (The raw edges of the arms will be sewn into the seams.)


Now push the arms up into the head to keep them out of the way. Push the legs into the body. Stitch across the bottom of the dress. (The raw edges of the legs will be sewn into the seams.)

Clip the seam allowance at the curves, especially at the neck. Turn the doll right side out through the opening in the dress. Stuff the doll firmly, beginning with the head. Close the opening with ladder stitch.
To embroider the face, thread an embroidery needle with 3 strands from a length of 6-ply floss. Tie a knot in the end. Insert the needle through the seam between the front and back of the head, coming up at one eyelash. Pull on the floss to pop the knot inside the doll. Make two straight stitches for eyelashes. For open eyes use satin stitch and back stitch the nose and mouth. For closed eyes use back stitch for the eyes and mouth.


Embellish your Josephine Doll any way you like. I attached wool balls for hair and random buttons on the dress. If you’d like, dip your finger in lipstick, blot on a tissue, then rub in circles on the face to make blushed cheeks.
Aw, give your doll a kiss and hug!

Thank you for this! I will be digging into my scraps this weekend!
Thank you! The kids at the hospital will love these.
What a cute little doll – thank you for your generosity. I love an opportunity to use up some of my scraps! I reckon my granddaughter might like to make one too.
I AGREE! Thanks much for sharing! Have a Merry Christmas ya’ll! This little cutie can add to the FUN!
thanks for sharing abby. I like to draft my own doll patterns but do enjoy reading how other doll makers make dolls. I liked the step re. leaving the legs out to stitch the main body. will be using this method next time I make a doll.
thanks again.
k
Okay, that’s awesome!
What a sweet little doll!! I have a Craft Gossip post scheduled for tomorrow morning that links to your pattern:
http://sewing.craftgossip.com/free-pattern-josephine-doll/2014/12/11/
–Anne
Thank you, Anne!
Adorable. I am going to try to squeeze in making a few of these! THanks for the pattern.
Thank you so much, I have been looking for this exact thing, some of our Church members are making hugging dolls for our missions to Hayti and this is perfect. I did enlarge the pattern a bit to make a bigger doll. Thanks again, May God Bless
Sounds terrific, Frieda!
how big does she come out? I am not sure what you mean about being sure the printer is on actual size?
thanks for your help
Hi Jackie,
The doll is about 6″ tall. When you set your printer to “actual size” it just prints the PDF so that it looks like my PDF instead of fitting it to the page which can change the size. Does that make sense?
Thank you for this detailed tutorial. It makes me want to try to make one of these :O)
So cute! Pinned.
Thank you!
These are adorable. I am going to make one for Josephine, my 2 year old niece! What size wool balls did you use?
Yay! My 4-year-old daughter is also named Josephine. I’m honestly not sure what size these balls are. They’re like gumball sized? I have a mixed bag.
So cute. Thank you for the pattern. I won’t get to her until after the new year but I will definitely make some. Thanks again!
Thank you soooooo much!! Am teaching my Grangirlie to sew this year…think these would be such fun to make together!! Thanks for sharing with us! 🙂
MERRY CHRISTMAS BLESSINGS!!!
I am teaching my granddaughter to sew and we are making this doll for her baby sister. Such a great tutorial, thanks.
Thanks for the pattern – I love mini-sized and I have a lot of scraps so I want to try this. Just a note…I’m assuming the doll face is the same as the “back of head”…think maybe you missed a step! Thanks for the face diagrams for embroidery – I love the little faces you did!
Thanks, Trudi. Yes, the pattern template for the front and back of the head is the same. Cut one Back of Head from felt and one from flesh-toned quilting cotton. I don’t think I missed that step!
You didn’t miss the step; just listed “back of head” twice in cutting instructions, once for felt and again for flesh tone. No big deal; I think the pictures make clear what you meant to type.
The doll is adorable. I am preparing to make my first one, which I’m sure won’t be my last one. 🙂
Hi Abby – thanks for sharing this cutie! Wondering if it would be okay to enlarge it a bit and use it for our church sewing ministry – She is nice and easy for those beginning sewing ladies/girls. Blessings to you – By the way – this is one of the best tutorial on sewing stuffed dolls – your text and pics are most instructional..
Of course. That sounds wonderful. And thank you for the nice words.
thanks
Thank you so much for this pattern. I just love it. I plan on making and giving them to little girls who have none. I appreciate it.
Merry Christmas and Happy New Year.
Abby, Thanks so much for the pattern….I’ve made 12 so far, they’re for little girls in Haiti , this doll is the perfect size for little girls that have no toys. I use beads for eyes, lips and a necklace…..thanks so much…
Wow! 12! That’s more than I made! Good for you, Jeannie, and I’m so happy to hear that they’ll be in the hands of children who really need them.
LINDAS MUÑECAS Y FACIL DE HACERLAS, GRACIAS POR LOS MOLDES, SALUDOS DESDE PERU¡¡¡
I would like to make some of these to go in our Boy Scout Camp/Young Woman Camp auction fundraiser in April. I make nothing off of them, but there is money involved that helps our teenagers at church go to a week of summer camp. Is this allowed with your pattern if I note who the pattern came from?
Also, I am a bit puzzled by the wool balls for hair. (Maybe I missed it on the pattern?) Do I buy these or do I cut small circles, stuff and gather into a ball using wool felt? Thanks for the help, Abby. I am loving your patterns! Just bought three more today!
Debra
Bonjour ;
J’ai fait connaissance de votre blog par le site ” Petit citron ” est je dois dire que je me régaler à admirer vos créations qui sont superbes . Etant depuis peu l’heureuse mamie d’une petite fille , j’aimerais lui faire la poupée “JOSEPHINE ” , j’ai imprimer le tuto ; mais je n’arrive pas à imprimer le patron car il n’y a plus rien sur la page . Vous serez t il possible de me l’envoyer , ce serait vraiment gentille de votre part .
je vous remercie et vous souhaite une bonne journée
BAZILOU
Hi,
Thank you for your nice words about my blog. I’m sorry you’re having trouble printing the pattern. Do you have Adobe Reader installed on your computer? You’ll need that in order to open the PDF.
Best,
Abby
These dolls are just darling. Have you thought of a Joseph doll? I have a darling little grandson and would to make one for him. Jane
Love this adorable doll. I decided to make one for my new grand baby due in March (#11). I’m not sure if I made it too small, but with my arthritic fingers it was a little difficult to turn etc… But I just do what I always do, made it my own. 😉 I added lace to the bottom of the hem since I couldn’t stuff the arms and legs into the small body. All of it my errors. but it still turned out really cute. I’m getting ready to put it on my blog spot, if you would like to check it out. sewcraftymesc.blogspot.com. Thank you again for sharing this cute pattern. I will make it again, but enlarge it more so I won’t have such a hard time. LOL….
Feel free to enlarge the templates if you’d like. The original is for a fairly small doll. I’m so glad you like it!
I agree. It was too hard to turn, by the time I tired to stuff the arms and legs in the body. I don’t think a child would be able to sew this. Or with my arthritic hands either. She is cute, but I think I will try to enlarge her for easier turning.
Those are absolutely gorgeous. Thank you for sharing your pattern and tutorial with us. Bless you.
I found you via #6weeksofsofties
i had pinned your dolly and i made it if you want to see it greetins from athens greece ,if you ever come here drop me a line .https://www.facebook.com/handmaderaveksilone/photos/pb.148292042045228.-2207520000.1425652887./338092623065168/?type=3&theater
So cute! Thank you, Sofia.
Hi! I am new to soft toy making. I am really allergic to wool. All the patterns I find seem to use wool felt for the hair. Would using an anti-pill fleece for the hair work? Is there any disadvantage to using fleece instead? Thanks for your help!
You could definitely use anti-pill fleece for the hair. Be sure to use a lot of pins while sewing so that the fleece stays in place. Another alternative would be bamboo felt. It’s a bit softer than wool-blend felt, but is still lovely to work with.
thank you for this sweet pattern, just wanted to share with you the ones I made last weekend http://www.donnabakertx.blogspot.com/2015/03/softie-josephine-dolls.html
Beautifully done, Donna!
These are adorable! I’m making one now for my new granddaughter. Do you know the origin of the “Josephine doll” name? I can’t seem to find it anywhere.
Thanks, and happy spring!
Hi Pat,
Thank you! What do you mean by the origin of the name? Sorry!
Abby
I’ve been scouring Pinterest for softie tutorials that are fairly easy with some nice details. Josephine sure fits that description. I’m off to see how many I can make for the Softie Drive for Foster Kids. Thanks for sharing your amazing talent!
Hooray! Happy sewing, Bethany!
I’m confused on how to turn the doll. First you have the legs out and sew from one corner to the other leaving the bottom open. Then you put the legs in and sew the bottom closed – where is the opening in the dress to do the turning? This is such a cute pattern! Thank you for sharing.
I just saw where you leave it open on the pattern. I didn’t see that at first. Such a sweet pattern.
Glad you figured it out, Laurie!
The dolls are adorable! I am having a hard time fitting in all the limbs inside the doll to sew the bottom seam. How much stuffing do you put in each limb? I assume that makes a difference. Thanks for th insight and for sharing your pattern.
If you’re having trouble, you can just stuff the hands and leave the rest of the arm unstuffed. Another option would be to leave the entire arm unstuffed, but leave a small opening in the seam. Then, after the doll is turned right side out, stuff the arms through the small openings and close them using ladder stitch. I hope that helps!
Thanks for the lovely pattern! I’ve been knitting STACKS of little teddy bears to put into the Santa Shoe Boxes. This is a nice alternative!
You’re welcome, Tania!
I made 2 of these from scraps I had laying around- my 4 year old LOVES them! She named them Starry and Five Clock. Thank you!
I’m so glad to hear that!
Never made a doll before, but am ready to try! However, I’m confused about where you left the hole for sfuffing, after you attached the front to the back. Thanks.
Hi Laura,
You’ll see a space marked “open” on the right side of doll’s body on the templates. That’s the spot to leave open for turning and stuffing.
I super love your dolls!!! I love the simple pattern and design…love also that they’re easy to make! Super adorable! Thanks for sharing! This tutorial was featured here: http://www.plushiepatterns.com/free-doll-pattern-the-josephine-doll/
I’ve completed my first doll but it’s so tiny it was difficult for me. For my second attempt I think I’ll try to hand stitch. Ann pointers? I had a hard time keeping the arm and body seams together. TIA!
If you’d like you could enlarge the templates on a photocopier.
Lovely
hermosa muñeca.Gracias por compartir.Cariños..desde Caracas-Venezuela
Hello, I started my own blog about doll making last week. I am a huge fan of your work and the Josephine doll pattern is one of the first topics in my blog! Greetings from Belgium.
That’s great to hear! Thank you so much and good luck with your new blog!
Very cute doll pattern – thanks for sharing. 🙂
I have a question about the seam allowances.
On the pattern they are 1/4″, but in the photos they appear to be 1/8.
I stitched a set each of arms and legs, and they are a bit scrawny.
I tend to stitch very close to the edge of the fabric.
Hi Abby, best wishes for this new year! Thanks for your tutorial, I made two dolls. The tiny one for a newborn baby and a bit taller for her big sister! The big one is embellised with a flower in the hair and on the dress, along with a string of little balls at the bottom of the dress. Thanks again and best wishes from the Netherlands!
I just sent in a request for the pattern for the Josephine Doll. So cute. Problem is need to start working on it tomorrow 1/13/17 as I will be giving it to my granddaughter who turns a year on Sunday. Any chance I can receive the pattern via email by tomorrow, 1/13/17, AM?
Vicki
Hi Vicki. I left a message before Christmas and still haven’t heard back. I can try sending you the PDF via email. Send me your email addy at zipgirlus@yahoo.com
JoAnn, where did you leave the message?
You should receive it in your inbox immediately after you enter your email address.
I was unable to download patter. Error message said Server Not Found.
If you email me Nancy I’ll get it to you.
Thank you for sharing.
I just love your work.
I also added my sisters email address and she received one too.
Next I shared to Facebook for my friends.
Love ❤️ love your work.
Thank you x
My daughter has been making some of these dolls for Operation Christmas Child Shoeboxes. I am a blogger for Operation Christmas Child and would love to include the link to your pattern in a post I am working on…. please let me know if you could grant me permission! Thanks so much!
Sure!
Um encato essas bonequinhas! Obrigada! Sucesso e felicidades sempre, com as bênçãos de DEUS!
Have just found your pattern and made one for my 4yo starting kinder and is struggling being away from me. Used fabric from my recently ripped blanket and finished it in one morning and she is super happy, will be making one for my 16mo and my 2yo niece.
Thanks for a super easy to follow pattern
You’re welcome, Kaitlyn!
Just got supplies to make these precious Josephine dolls.
Wondering why they are called “Josephine “ dolls?
Thank you for offering the pattetn for free
Because I like that name.
Came across the cheerful Josephine Doll pattern. Just finished seeing first one.
My question is how you transferred the drawing of the features to embroider on face.
Thank you
Hi, I sent a request to receive a PDF of the doll pattern this morning. Wondering if you got it, and how long I might have to wait for the pattern? (I realized the original post was from several years ago, so I’m hoping it’s still available!!)
Thank you
It’s immediate (the process is automated).
Hi Abby,
Just found your website and the Josephine Doll. She is adorable and will be perfect for the little girls who receive my Operation Christmas Child Boxes. A perfect size -hoping I’ll be able to stuff. Thank you so much for sharing.
Karen
I helped my 7- and 9-year-old granddaughter s make their own dolls yesterday. They LOVED doing it and they turned out so cute. Thank you so much for sharing this pattern. I thought you might enjoy knowing it is still being used!
That’s great to hear, Linda.
I can’t wait to make one for my new grandbaby -due any day now. I’m starting immediately so I can bring it when I first hold her! Thank you for sharing the pattern.
Naomi
Thank you Abby for being so generous!
Veronica du Preez – email address below : please send me a copy of your PDF version of the Josephine Doll.
Many thanks.
Veronica – did you try to use the box within the post? Please try that first.
Sewed the doll tonight. Thanks for the pattern and your guidelines. I used Bob the Builder fabric for the top and sewed the “dress” narrower and now have a littler boy doll.
So cute!
Hi Abby,
Zelda from South Africa,
Thank you so much for sharing your free pattern. I recently came across the pattern and already made a few of these dollies. I would like to know, may I sell the dolls I make whilst using your pattern? I am new at making fabric dolls and so far this is my first attempt using your pattern.
Hi Zelda, I ask that you not sell items you make from my free patterns. You’re welcome to sell what you make from any of the patterns you purchase from me. Thank you, Abby